

The Complete Guide To WordPress Microsites
Have you ever wanted to create a WordPress website for a specific project, event, or campaign but didn’t want to go through the hassle of building an entirely new website from scratch? WordPress Microsites is the solution you’re looking for.
WordPress has a reputation for being very flexible, there are tons of features and functionalities within WordPress that let you adapt to a myriad of use cases.
This article will explore one of these nifty features called “Microsites”.
Let’s get stuck in.
What is a WordPress Microsite?
Simply put, a microsite is part of an existing WordPress website with a different domain name and separate content.
Microsites share the same WordPress setup (files, database, etc.) as the main site and can be seen as an advanced permalink for specific website resources assigned to them (pages or posts).
You can also think of microsites as an alias you want users to see when they visit certain parts of your WordPress website. An alias is a domain name that is used as an alternate or secondary name for an existing website. This allows users to access specific parts of a website using a different URL or domain name, without affecting the main website.
For example, for the blogging section of your business website, you could assign all of its content to a microsite with an alias or subdomain, i.e. “businessnameblog.com” or “blog.businessname.com”.
Microsites are also used for localisation. You create country-specific subdomains (i.e. “fr.domain.com”, “us.domain.com”) and use them to create microsites within one main WordPress installation. Each microsite would target a single country, with content optimized for that demographic.
Microsites are most commonly used for marketing-related purposes as an effective way to save money and time for projects.
Instead of creating separate WordPress websites each time there’s a marketing campaign, microsites make it possible to quickly spin up a landing page on your main WordPress instance with a separate domain.
Differences between a WordPress Microsite and a Multisite
If you’re hearing about microsites for the first time, you’re probably asking, “What about WordPress Multisites? Don’t they do the same thing?”
The answer is yes… but not exactly.
The WordPress Multisite feature allows you to create a network of sites all controlled by one super-admin and main WordPress installation. Each website in the network can have its own set of themes and plugins and look completely different from others.
From a visitor’s perspective, both multisite and microsites are perceived as the same. But with microsites they will all share the same plugins and themes since they are only aliases for the main WP Domain.
In essence, microsites and multisites are not interchangeable, even though they share some similarities. When there’s a need to have complete control over additional sites, multisite is the best choice due to all sites on the network having separate themes/plugins capability.
Common Limitations of Microsites
The main selling point of the WordPress microsite feature is that all sites added to the network share the same WordPress resources.
This allows for easy management of multiple websites from one central location. However, there are some limitations to using microsites that website owners should be aware of.
For one, if the WordPress instance stops working due to a server error or bug from an updated plugin, all microsites go down with it. This means an entire network of microsites can be taken offline at any moment if the WordPress installation they share is compromised.
Another major limitation is in user management. Since all microsites share one WP instance, they also share the same users. There’s no way to assign users to one specific microsite, and all admin accounts have access to the entire network.
This is where the Multisite feature outshines microsites.
But then again, microsites are mostly used for small marketing-related projects that don’t usually require complex user management functionality .
Features of WordPress Microsites
Here are some features that are currently possible with WordPress microsites:
Domain and Subdomain Mapping to Pages, Posts, Products and Custom Post Types
The ability to map any post type to a specific domain is the main functionality that makes microsites so powerful. With this feature, you can group an entire part of your WordPress site under another domain, subdomain or subdirectory.
There’s also support for taxonomy grouping which allows users to assign single or multiple categories/tags of a post type to a microsite.
You can also use the mapping feature in E-commerce by assigning each brand a separate microsite (i.e. prada.store.com) with only products from that brand displayed.
The microsite mapping feature is powerful, flexible, and can work with the most common and complex use cases.
URL Rewriting on Mapped Pages
Microsites don’t just map content to a new domain/subdomain. They also rewrite links to all internal resources under them.
This means all images hosted on your WordPress server will automatically inherit the microsite domain/subdomain instead of the main domain.
The URL rewriting feature allows you to share the same resources amongst different microsites. Instead of uploading the same images across separate WordPress installations, you get access to one central media gallery.
URL rewriting also applies to other resources like videos and documents, so even if visitors inspect your website’s source code, they won’t be able to tell the difference.
Support for Query String Parameters
Query strings are commonly used when tracking marketing campaigns.
Microsites allow you to add query string parameters to the URL, which will remain intact even when visitors navigate to different pages on the microsite.
This is useful for tracking visitors to a particular microsite and generating analytics data.
Microsite-specific Favicon Support
Another feature of WordPress microsites is the ability to have microsite-specific favicon support. (A favicon is the small icon that appears in the browser tab when you visit a website.)
With microsite-specific favicon support, you can customize the favicon for each microsite to match its branding or theme. This helps make each microsite more distinct and recognizable to visitors, improving user engagement and brand awareness.
Additionally, having a unique favicon for each microsite can make it easier for visitors to switch between different microsites, as they can quickly identify which tab corresponds to which microsite.
WordPress Multisite Integration
Why choose between multisite and microsites when you can have them both?
Depending on the use case, you can easily integrate microsites within a multisite setup. This grants you the ability to create microsites for any website on the network with the ability to manage everything from within one super admin.
In many cases, the WordPress multisite feature should be enough to manage multiple sites within a single installation. However, a microsite plugin may be necessary if you need more advanced features such as domain mapping, URL rewriting, and support for query string parameters.
Creating a WordPress Microsite in 4 Simple Steps
Creating microsites in WordPress is quite simple. There are two major plugins that enable microsite functionality: Domain Mapping System and WP Landing Kit.
Both of these plugins require a paid subscription and have similar features, but I recommend the Domain Mapping System plugin as it offers more features out-the-box compared to alternatives.
This guide will use the Domain Mapping System plugin, which has the most features and a straightforward setup process.
You may also decide to code your own microsite plugin. This unlocks more control and flexibility but comes with a hefty cost and maintenance.
Step 1: Acquire a domain or subdomain
The first thing you need to secure for a microsite is a domain name. All you need is to register it with a domain registrar.
If you want to use a subdomain, you can set it up in your hosting account or domain registrar’s control panel. For example, if your main domain is www.example.com, you can create a subdomain like microsite.example.com.
With the domain taken care of, let’s move on to the next step.
Step 2: Configure Domain DNS records
To configure DNS records for your microsite’s domain, you need to access the control panel provided by your domain registrar or hosting provider.
Once you’re in the control panel, look for the option to manage DNS records for your domain. Depending on your registrar or provider, this may be labelled as “DNS Management“, “Zone Editor“, or something similar.

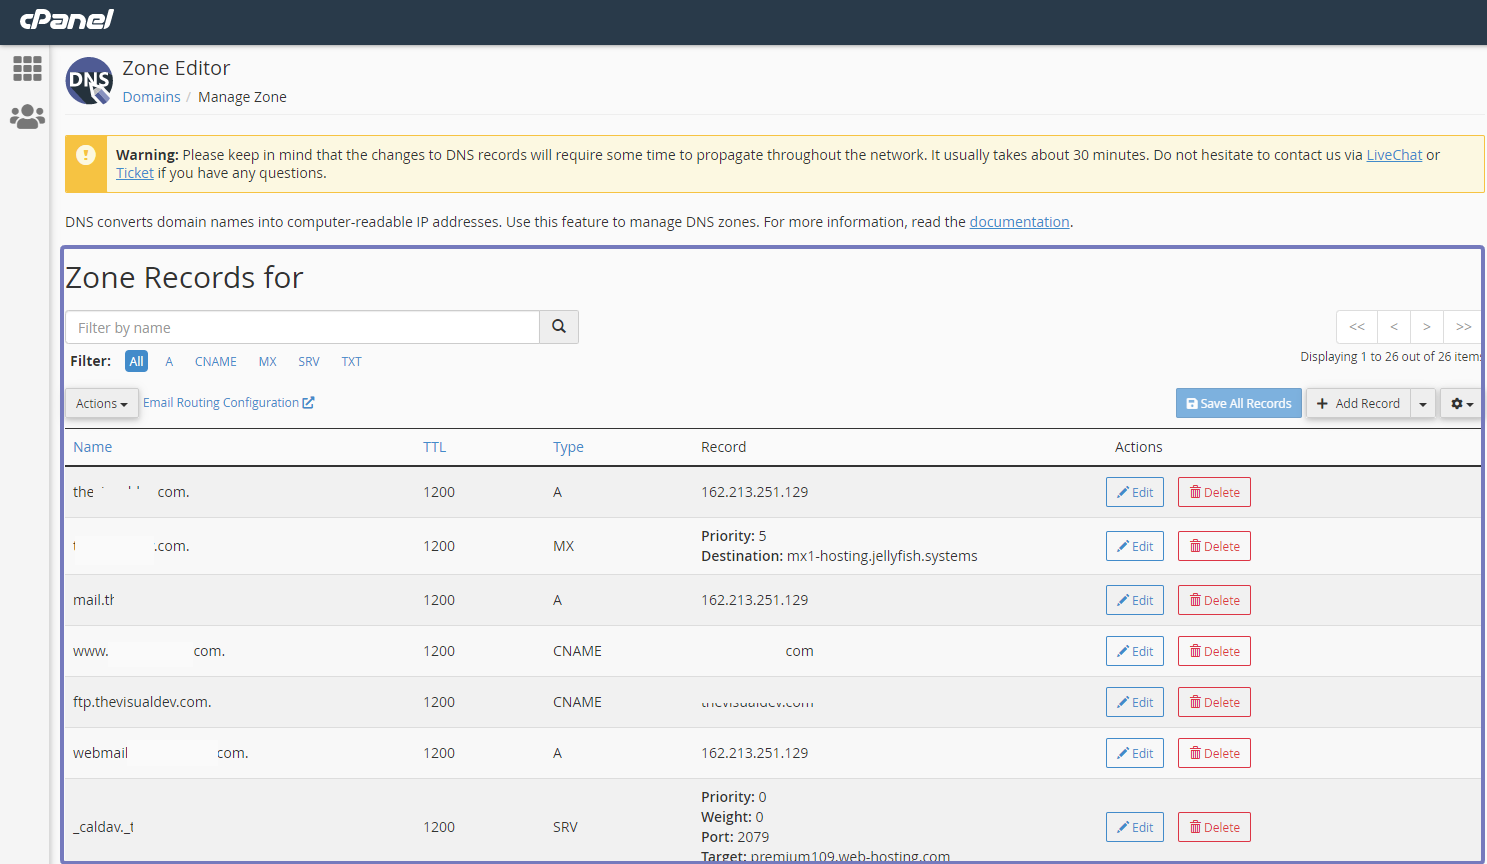
In the DNS management interface, you’ll typically see a list of different types of DNS records you can configure. The most common ones are:
A record: This maps your domain name to an IP address. You’ll need to enter the IP address of your existing WordPress site’s hosting server – this will allow you to set the domain as an alias later.
CNAME record: This maps a subdomain to a domain name. For example, if you want to use the subdomain “blog.example.com” for your microsite, you can create a CNAME record that points it to “example.com”.
MX record: This specifies the mail server responsible for handling email for your domain.
TXT record: This is used for various purposes, such as verifying domain ownership for third-party services or setting up SPF records for email authentication.
Once you’ve configured the necessary DNS records, the changes may take some time to update. This typically takes a few hours but can sometimes take up to 2 days.
After the DNS changes are updated, the last step is adding the domain/subdomain name as an alias of your main domain on your hosting server’s Cpanel.
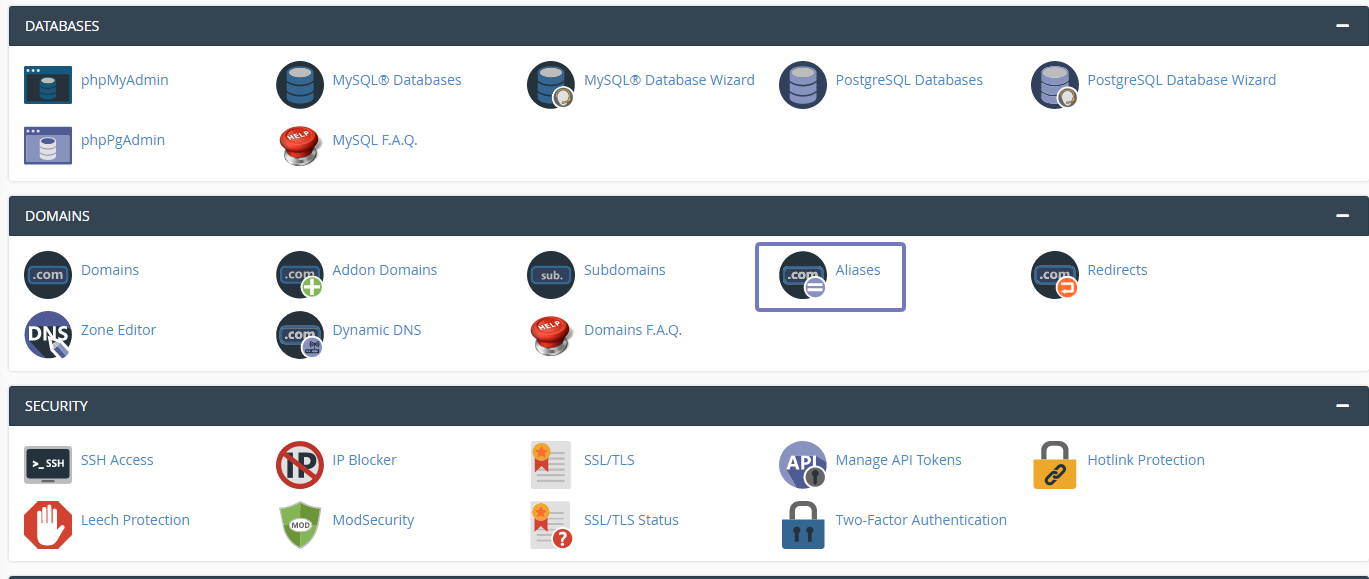
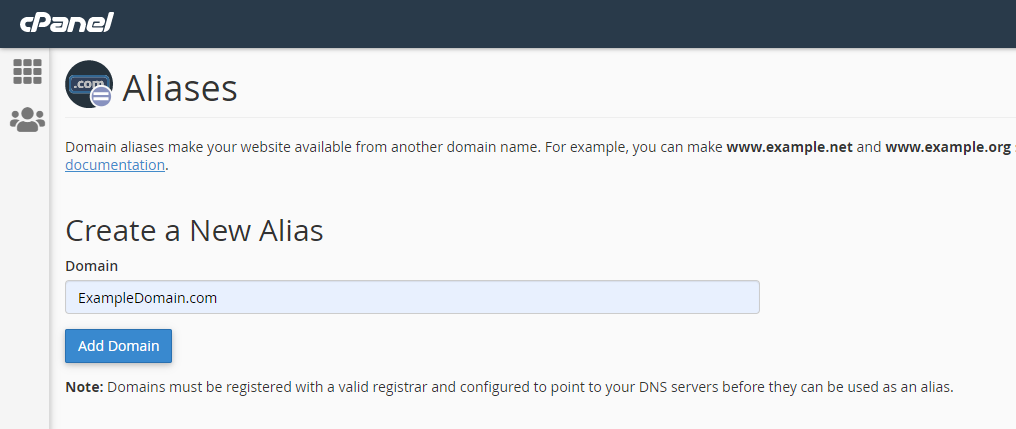
Set the domain default path to the home directory of your existing WordPress site’s folder.
After adding the alias, you can proceed to install and configure the microsite plugin.
Step 3: Install and Activate the Domain Mapping System plugin
After acquiring a domain or subdomain and setting up the DNS, the next step is to install and activate the Domain Mapping System plugin. You can do this by going to your WordPress dashboard, selecting Plugins> Add New, and searching for “Domain Mapping System”.

Once you’ve found the plugin, click the “Install” button and activate it.
Step 4: Map Domain/Subdomain to Microsite Content
After activating the plugin, go to the Domain Mapping System settings page and enter the domain or subdomain you’ve set up. You’ll also need to select the content the microsite domain will be mapped to, which can be anything from a single page, product, post or custom post type, or taxonomy archives like categories and tags.
You can also add a custom favicon for every domain you add and query string parameters.
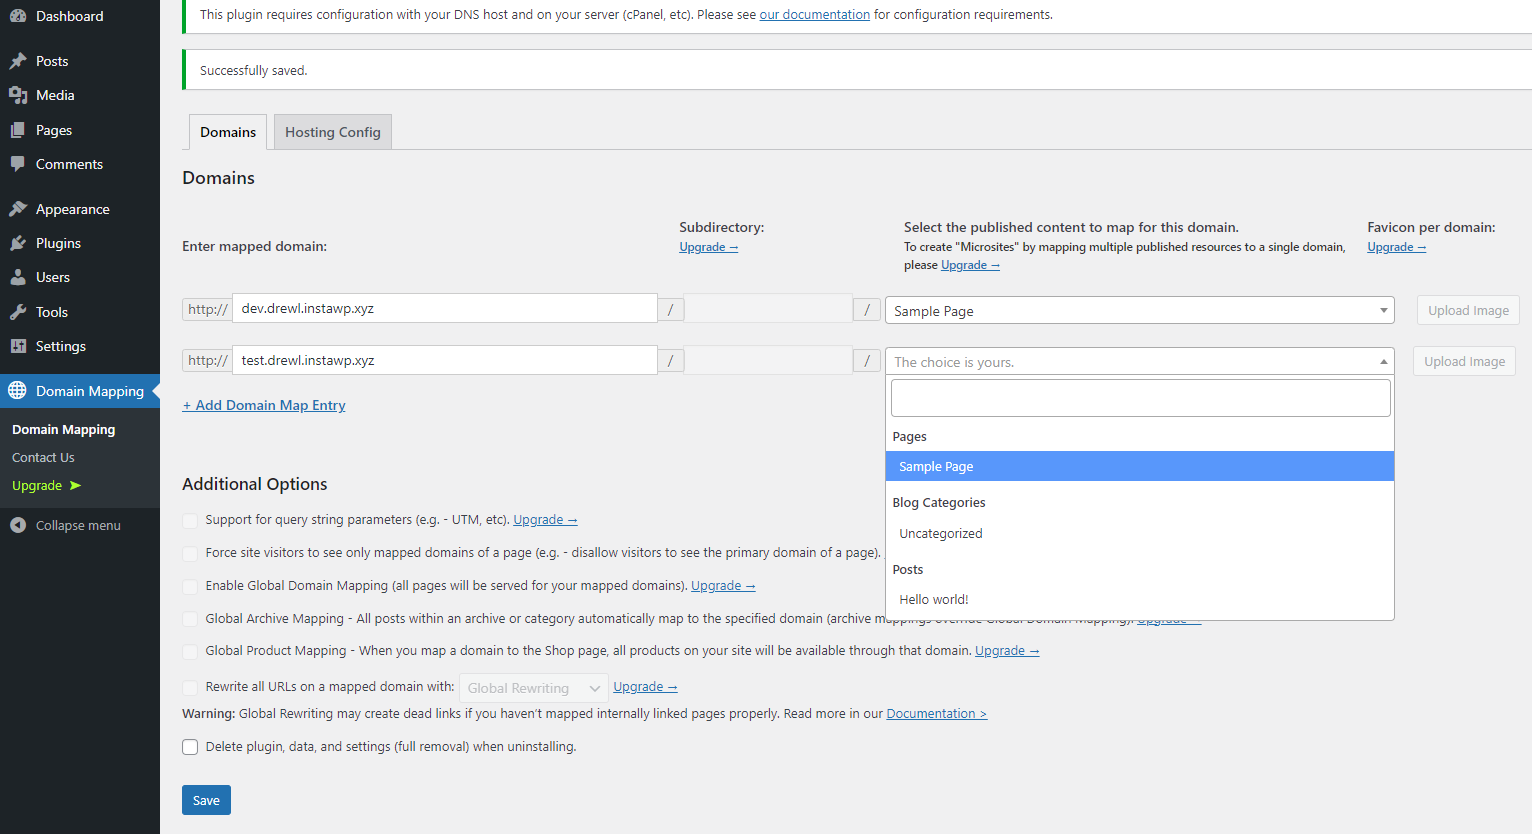
Once you’ve saved the settings, the plugin will automatically map your domain or subdomain to your WordPress site-assigned resource, creating a microsite.
Conclusion
In conclusion, creating microsites using WordPress is a valuable tool that greatly enhances your website’s functionality and aesthetics.
Whether you are a blogger, small business owner, or web developer, implementing microsites into your WordPress website can help you provide targeted content, improve user experience, and create a more dynamic online presence.
Book a 30-min Introduction Call
Let's jump on a quick intro call We'll break down your project, and pinpoint exactly how we can help.


Our clients  Holaa! love working with us see their stories below!


