The Essential WordPress Localisation Guide
Are you looking to reach a global audience with your website? First of all, congrats! It’s a pretty exciting step to start taking your content to the international stage.
Secondly, we’re here to help you out with this handy WordPress Localisation Guide.
This guide will cover everything you need to know about WordPress localisation. We’ll cover some key concepts to know about when localising your website as well as looking at how to set up localisation features with a WordPress plugin.
What is WordPress Localisation?
WordPress localisation is the process of adapting your WordPress site’s content and design to cater to your target audience’s different languages and cultures.
It goes beyond simply translating the text on your website.
Localisation involves customising various aspects of your website, including images, videos, local currencies, privacy laws, and other region-specific details to make your site more accessible and user-friendly for visitors in different locations.
Localisation vs Translation
Although these terms are sometimes used interchangeably, they each have specific meanings and implications for your WordPress website.
Translation: Translation is converting your site’s content from one language to another.
Localisation: Localisation involves adapting your WordPress site to appeal to users in a specific region. This includes not only translating content, but also adjusting other elements to fit their cultural preferences.
Although translation is an essential aspect of localisation, it’s only a piece of the puzzle. A successful localisation strategy goes beyond translating text and tailors all aspects of the user experience to each region.
Why Localise a WordPress Website?
If you have, or are intending to have, a sizeable international audience, then it’s a good idea to localise your site. Simply put, it’s going to provide a more personalised experience for your users.
Some of the benefits of localisation include:
- Broader audience reach
- Higher engagement
- Greater conversion rates
- Competitive edge
Localisation Statistics
Personally, I love a good stat. So, if you’re a fellow statistics enthusiast, then you’ll enjoy these snippets of research on localisation.
- According to Internet World Stats’ compilation, although English is the most popular language on the internet, only 25.9% of internet users speak English.
- A study conducted by Common Sense Advisory revealed that 76% of consumers are more inclined to purchase from websites that present information in their native language.
- The same survey revealed that 56.2% of consumers prioritise accessing information in their native language over the product’s price itself.
- In the “Can’t Read, Won’t Buy” report by CSA Research, a survey of thousands of consumers across 29 countries revealed that 76% of consumers choose to purchase products with information in their native language, and 40% would not even consider buying from a website in another language.
How to Localise Your WordPress Website (Step by Step)
Alright, let’s get stuck into the main course: How to localise your WordPress site.
Step 1: Choose the Right WordPress Theme
Your theme is the bedrock of your website’s appearance and functionality. When selecting a theme, check that it is translation-ready and can support multilingual plugins.
You will find all this information in the theme description. Alternatively, contact the theme developer to confirm if the theme supports localisation.
If you have a theme installed on your website already, confirm that it’s compatible before you proceed. Some popular WordPress themes that support localisation are Avada, Divi, Woocommerce, The7, Astra, OceanWP, etc.
Step 2: Choose the right WordPress Localisation Plugin
As always, the easiest way to do something with WordPress is usually with a plugin.
Before choosing a localisation plugin, you should consider the following factors:
- Cost efficiency
- Compatibility with your theme
- The languages it supports
- Ease of use and control over translations
- SEO features for different languages
- The level of customer support and updates the plugin developer offers.
If you want to know more about the available plugins then check out our list of the best WordPress localisation plugins.
Step 3: Install and Activate the Plugin.
For the purpose of this tutorial, we’ll be using the TranslatePress plugin.
Search for TranslatePress and click on the Install Now button to install the plugin.
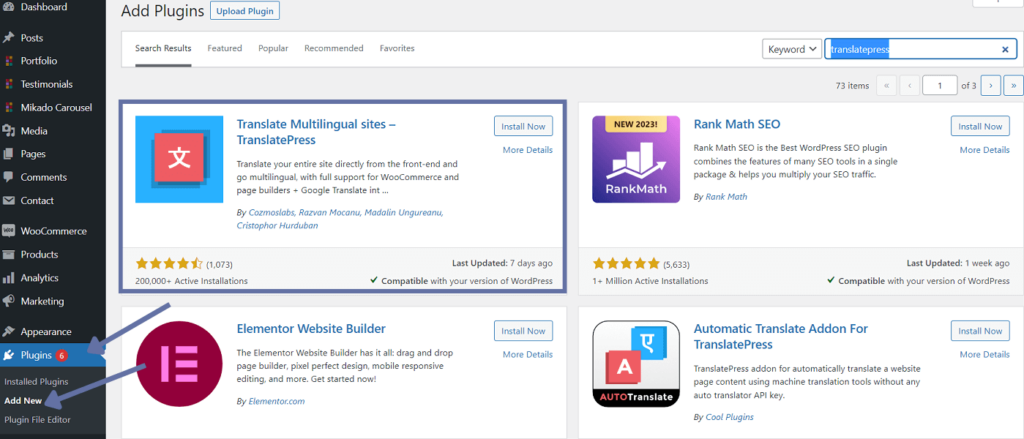
Once installed, click on Activate to apply it to your site.
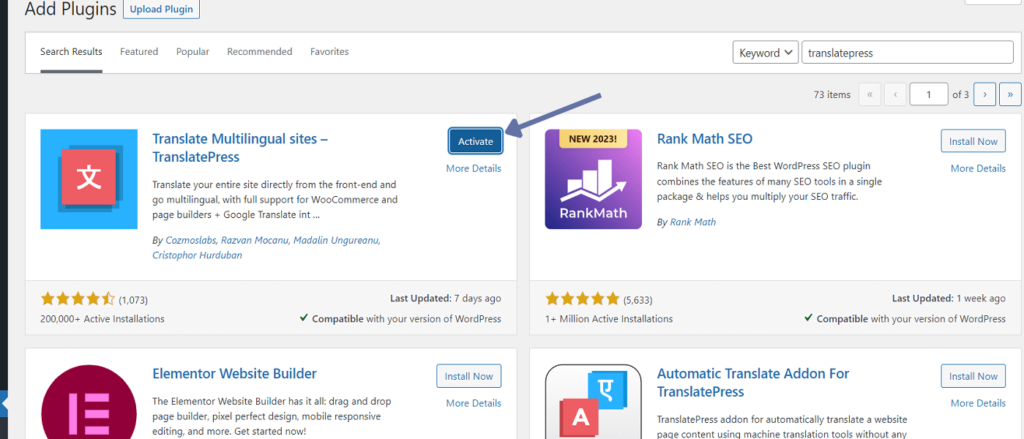
Now TranslatePress is up and running and you’re all set to start localising.
Step 3: Choose Languages
Go to Settings > TranslatePress. On the TranslatePress settings page, add the languages you want to provide on your website.
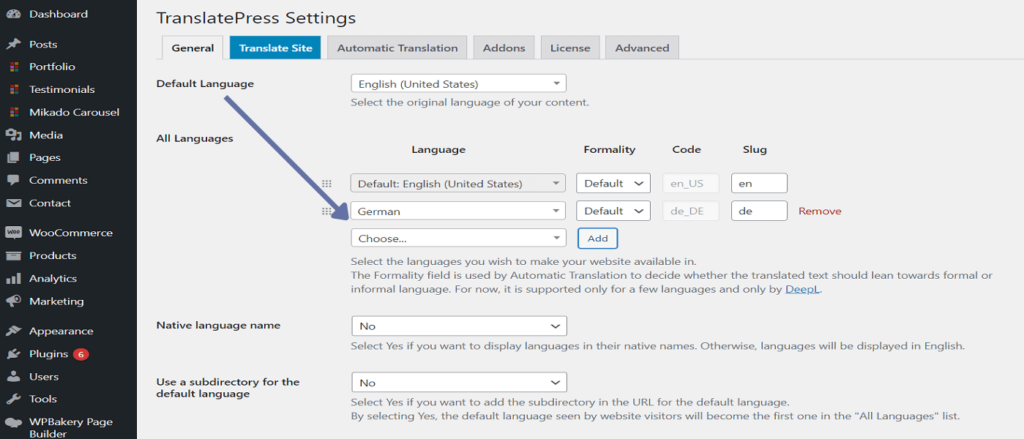
On the same page, you can configure how you want to display the language names and how you want the language switcher tool to appear.
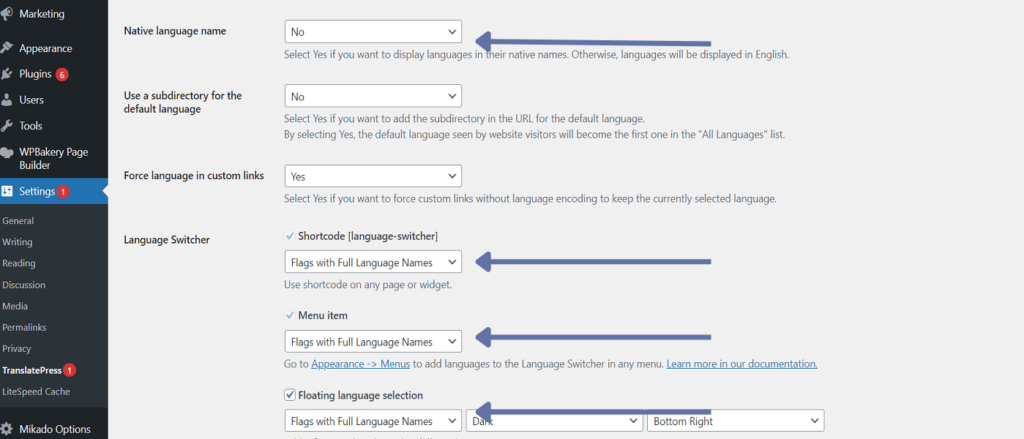
Click on Save Changes when you are done.
Et voila! WordPress is now aware of all the languages you want on your website. Now, let’s localise different sections of your website.
Step 4: Localise Your Text Content
TranslatePress allows both manual and automatic translations.
Manual translation – This involves using the plugin’s point-and-click interface. The process is easy enough for you to do yourself. Since you’ll be translating the texts yourself, you can be sure of 100% accuracy. However, the process can be time-consuming if your website has a lot of content.
Automatic translation – The plugin integrates with Google Translate or DeepL to generate your translations automatically. This approach can save you time and a lot of mental energy. But the translations may not be perfect.
Let’s look at how to implement both approaches:
Manual Translations
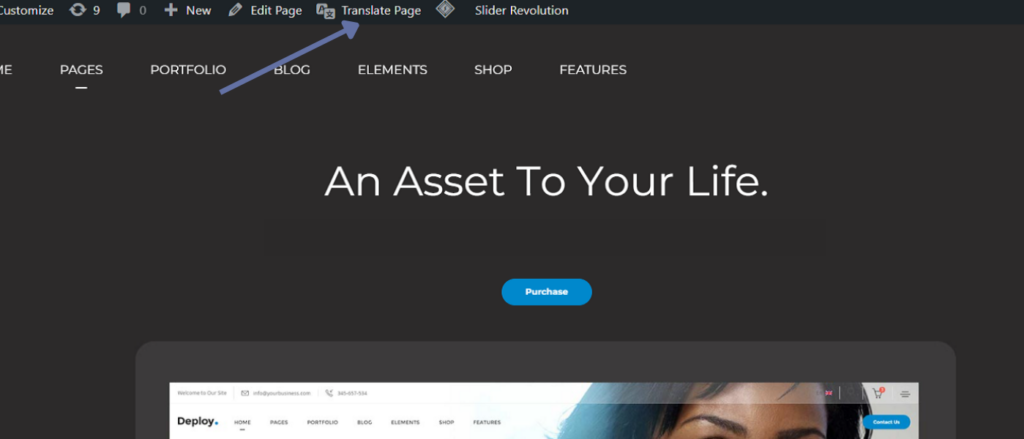
To begin, go to any page you want to translate and click on the Translate Page option in the top bar:
Now you’ll see the translation editor. To translate any text on the page, hover over the text and click on the pencil icon beside it, and a new panel where you can input your translation will appear in the left sidebar.
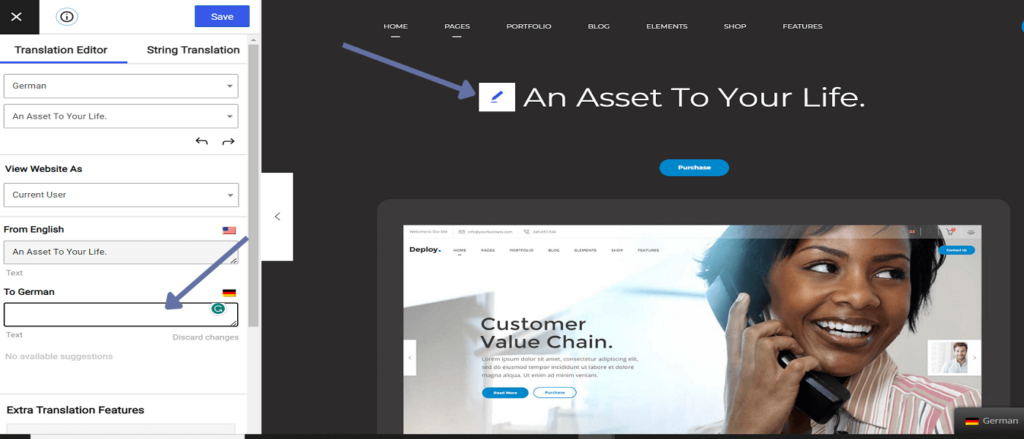
Follow the same process for each block of text on the page until you completely translate them. Don’t forget to Save your translations.
Automatic Translations
Click the Automatic Translation tab on the TranslatePress settings page to set up automatic translations.
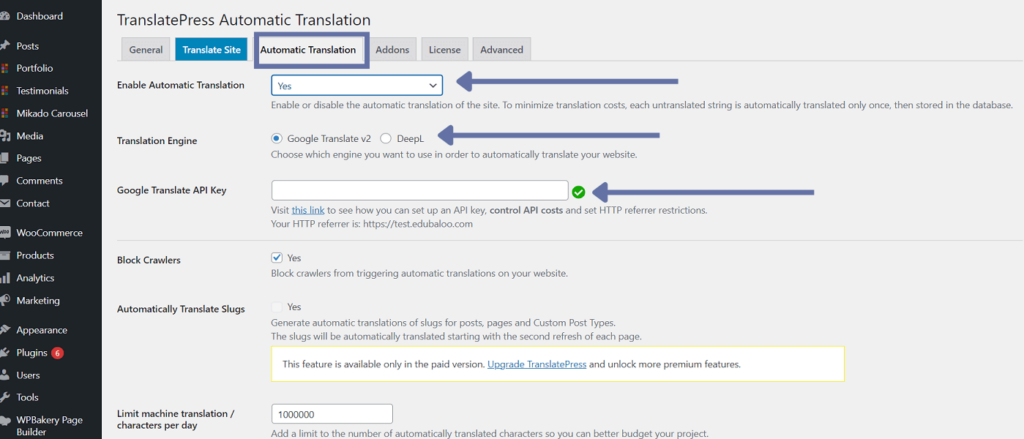
Select “Yes” in the drop-down option next to Enable Automatic Translation. Next, choose your preferred translation service.
You’ll need to generate an API key from your translation service. (See how to generate API keys here.) Once you have the key, add it to the TranslatePress settings.
Click on Save, and you’ve successfully enabled automatic translation.
Now, you can return to the translation editor as we did earlier. You’ll see that the translation service has pre-filled all of your content’s translations.
Review them, and if you notice any translations that sound off, you can edit them.
Step 5: Localise Media Content
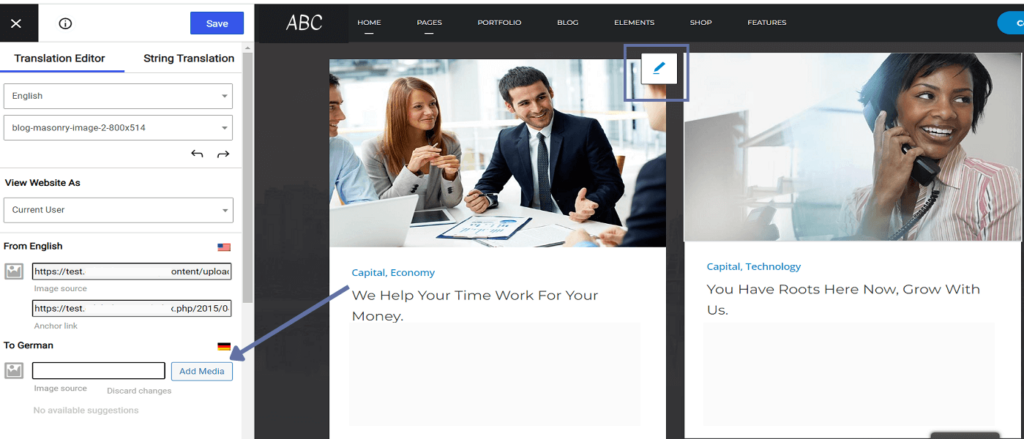
This process is similar to what we did for the text content. Just click on the pencil icon beside the image, video, slider, or audio file and replace it with another file from your media library or computer.
Step 6: Localise SEO Settings
In addition to its core features, TranslatePress offers a premium add-on called SEO Pacl. This add-on lets you translate all essential SEO elements on a given page.

The TranslatePress SEO Add-on is an all-encompassing solution that auto-generates multilingual sitemaps and correctly sets hreflang attributes for each localised page.
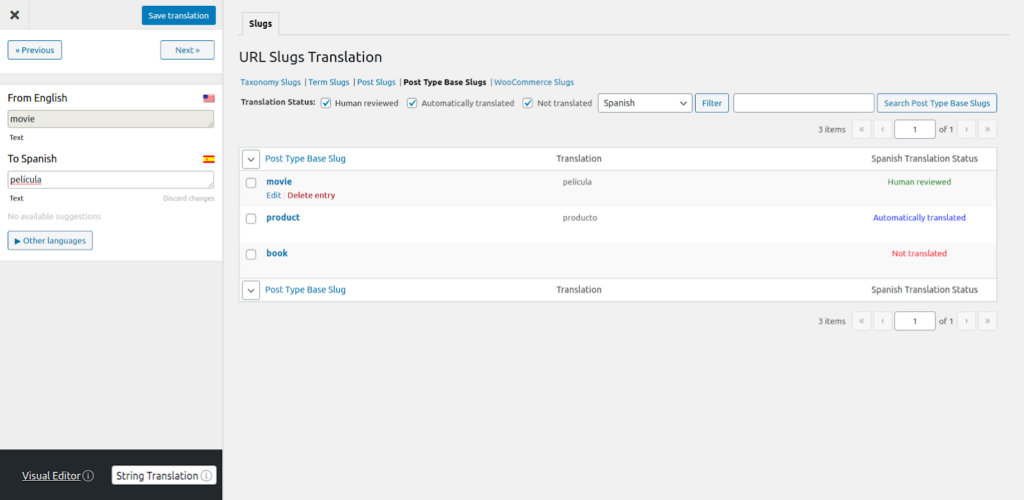
With its user-friendly click-and-drop interface, the SEO Add-on simplifies the process of modifying each page’s URL slug and translating the page title and meta descriptions. This ensures that your localised pages are both accessible to users and optimised for search engines in their respective languages.
But the features don’t stop there. The SEO Add-on also extends support for translating other key SEO elements, including schema markup, social graph info, and more.
8 Essential Elements of WordPress Localisation
Now that we are clear on the basics of WordPress localisation let’s look at some of the main components that contribute to a successful WordPress website localisation.
Translating Content for Your Target Audience
The most fundamental component to get started with when localising your WordPress site is translating all of your website’s text content for the target countries.
This involves not only the main content, but also the navigation menus, buttons, forms, and metadata, all of which should be translated into one or more localised versions.
You can start by automatically translating your site’s content using translation tools like Google Translate or an AI-based solution like Neuronto AI. However, bear in mind that automated translations may not consistently capture the intended meaning, potentially leading to miscommunication or confusion.
When translating, it’s essential to consider unique idioms, expressions, and subtle cultural meanings to avoid being unintentionally offensive. A simple word-for-word translation may not be sufficient here.
So, to ensure your translations are accurate and culturally relevant, use translation plugins, hire professional translation services, or work with native speakers.
Adapting Design and Layout for Translated Text
Once you’ve got the translations figured out, you need to ensure your site’s design and layout will display the translated texts correctly.
Sometimes, the length of the translated text may be shorter or longer than the original text, which can mess up how your website looks.
To avoid this, you might have to adjust font sizes and styles, resize images, or change how some elements are placed on the page.
Another example is how texts in some languages, such as Arabic or Hebrew, are written from right to left. You will need a mirrored layout if your site is translated into these languages.
Cultural Customization
Effective localisation involves not just translating content, but also adapting it to suit the interests, preferences, and customs of each intended audience.
For instance, when visiting McDonald’s websites for different countries, you’ll notice that the content, menu items, and visuals are tailored to the tastes and preferences of each specific region.
In India, McDonald’s recognizes the cultural and religious importance of not consuming beef or pork. So, on their Indian website, they don’t display or offer any beef or pork. Instead, they replace them with various vegetarian options and locally inspired dishes.
If you’re interested in learning more about this aspect of localisation, then read our “Essential Guide to Multilingual Content Marketing” for an in-depth exploration on how to tailor content to different cultures.
Adapting to Local Currency and Payment Options
Make sure that users see prices in their local currency for a smoother customer experience. Additionally, pay attention to other details such as how some European countries will add the currency symbol after the amount (i.e 10€). You can add a currency switcher plugin to make this easier.
You’ll also need to check the preferred payment gateways in the countries you’re marketing to.
Converting Units of Measurement
Another detail that you’ll need to adapt is the units of measurement you use on your site. Depending on where your audience is, you’ll have to consider whether they use inches or centimetres, pounds or kilograms, Celsius or Fahrenheit, etc.
It’s a small detail but it will make people’s lives easier and save them the minor annoyance of having to convert the units themselves. Good UX is all about these little details.
Using the Right Time and Date Formats
You need to make sure you’re also including the right date formats on your website for different regions.
For example, people in the U.S. use the MM/DD/YYYY format and interpret this 05/10/2023 as the 10th of May, while most people in other locations use the DD/MM/YYYY format and will see it as the 5th of October.
Complying With Local Laws And Regulations
Research and adhere to local laws, regulations, and privacy policies in each target region to ensure your website operates legally and ethically.
For example, in Germany, websites must have an “Impressum” page, which provides specific contact information about the site owner, including their name, address, and email.
Boosting Visibility with SEO Localisation
After putting in all that effort to localise your site, you need to make sure that your target audience can easily find you in search engines.
Here are some tips for effective multilingual SEO:
- Cover Local Search Engine Preferences: Each search engine has its unique algorithm, and some countries have distinct search preferences. For instance, Google functionality is restricted in China, so Chinese consumers use Baidu or Yandex. In this case, you’ll be optimising your content according to Baidu and Yandex’s preferences.
- Conduct Target Market Keyword Research: Conduct keyword research for each target market to identify their most common search terms. They may use local slang, idioms, or unique terminologies to find your website, so covering these terms as keywords in your content is important.
- Implement Geotargeting: Geotargeting allows you to target your website to users in a specific country speaking a particular language. Google recommends using a consistent country-specific URL structure or subdomain, such as how Nike has “nike.com/jp” for Japan and “nike.com/ca” for Canada, to make it easier for customers to find the correct website for their region.
- Translate Key Site Elements: To improve the appearance of international SERPs, translate your title tags, meta descriptions, URLs, and image alt tags.
- Use hreflang tags: Hreflang tags are essential for multilingual SEO. A lot of WordPress localisation plugins will handle this for you, but nonetheless it’s good to know about them. Basically “hreflang” is an HTML attribute that specifies the language and geographical targeting of a page to Google. Using hreflang will ensure that your users see the right version of your page in their Google results.
Hreflang tags look like this: <link rel=“alternate” hreflang= “fr” href=“https://yoursite.com/except-its-in-french”>
This indicates to Google that there is an alternate version of this page in French. The particular language is indicated by ISO 639-1 codes, in this case the “fr” shows that the page is in French.
You can also use the hreflang tag to indicate a particular country or region. For example, you can differentiate between the US English and UK English variations of a page. To do this, you would use hreflang=“en-gb” for the British version and hreflang=“en-us” for the American one.
Wrapping Up
Localising your WordPress site is crucial in managing an international online presence.
It can be a tricky process but it’s absolutely worthwhile. If you’re looking to go global with your WordPress site and fancy a helping hand, then feel free to get in touch with us! Our WordPress design and development services include multilingual and localisation features along with UX and SEO optimisation for an ultra-polished international website.
Book a 30-min Introduction Call
Let's jump on a quick intro call We'll break down your project, and pinpoint exactly how we can help.


Our clients  Holaa! love working with us see their stories below!
