

How to Change a WordPress Theme (Without Breaking Your Site)
Are you considering a fresh new look for your WordPress website? A well-chosen theme can significantly enhance your site’s aesthetics, user experience, and functionality. But if you’re going to switch up your WordPress theme, it’s important to do it properly. In this guide, we’ll walk you through everything you need to know to change your theme (and not break your site in the process).
Why the Right Theme Matters
Changing the look and feel of your site can be a great way to breathe new life into it. A new WordPress theme might be just what you need to create a more engaging experience for your visitors.
According to a study by Google, the first impression of a website’s design plays a crucial role in user engagement. People will form an opinion about your website in as little as 50 milliseconds.
Another piece of research by Stanford University revealed that 75% of users judge a company’s credibility based on its website design. So, an attractive and user-friendly design is essential in improving user engagement and conversion rates.
Precautions to Take Before Switching to a New WordPress Theme
Before changing your WordPress theme, you’ll need to take some precautionary steps.
As with all things in life, there’s always a slight chance that things go horribly wrong. In this case, you could lose all the content on your site and have to start again from scratch.
So to save you from all that “slamming-your-face-into-your-keyboard” frustration, we’ll go through the steps to make sure you don’t accidentally lose anything important.
Here’s what you need to do before switching your theme.
Copy Snippets, Tracking Codes and Shortcodes From Current Theme
First, save any custom code snippets, tracking codes (like Google Analytics), and shortcodes you’ve added to your current theme. These elements are crucial for maintaining your website’s functionality and tracking performance.
To avoid any hiccups, take a moment to copy and save these codes in a safe place, like a text file or a cloud-based note-taking app like Google Keep or Evernote. This way, you can quickly add them to your new theme once installed.
Measure Current Loading Speed
You don’t want your website’s performance to suffer after switching themes. So before changing your theme, make sure to check your site’s current loading speed. This will give you a baseline to compare against once you’ve switched to the new theme.
WordPress speed is vital not only for user experience but also for SEO, so the goal is for your new theme to be equal to or faster than your previous one. Having these metrics will help you assess whether the new theme positively or negatively impacts your site’s performance.
You can use tools like GTMetrix and Google PageSpeed Insights to measure your website performance before and after the theme change.
Create a Full Backup
Accidents happen. And it’s better to be safe than sorry.
Before tinkering with any significant changes to your site, you’ll need to create a complete backup of your WordPress files, database, and media library.
This backup will be your safety net, allowing you to revert to your previous setup if anything goes wrong during the theme change.
You can use a backup plugin like UpdraftPlus, or create a manual backup through your web hosting control panel.
Take Note of the Sidebar Content
Before switching themes, review your sidebar content, including widgets, custom menus, and any other elements you’ve added. Jot down the details or take screenshots to recreate these elements in your new theme quickly.
Some themes have different sidebar structures, so having this information handy will help you reassemble the sidebar more quickly and efficiently.
Put Your Site in Maintenance Mode
As you work on your website during the theme switch, you don’t want your visitors to encounter a broken or half-finished site. To avoid confusing your visitors during the transition, put your site in maintenance mode.
This will display a temporary “under construction” or “coming soon” page to your visitors, explaining that your website is undergoing updates while you work behind the scenes. You can use a plugin like WP Maintenance Mode or SeedProd to enable maintenance mode on your site easily.
Create a Staging Environment
A staging environment is a clone of your live website where you can safely test changes without affecting your site. Creating a staging site before switching themes is good practice, as it allows you to work out any compatibility issues and make necessary adjustments before going live.
Most managed WordPress hosting providers, like SiteGround or WP Engine, offer built-in staging features. Alternatively, you can use a plugin like WP Staging or Duplicator to create a staging environment.
By taking these precautionary steps, you’ll be set for a smooth and stress-free transition. Now let’s focus on changing your theme.
How to Change Your WordPress Theme (in 3 Steps)
After following all the above precautions, you’re all set to change your WordPress theme. Let’s walk you through the process in three simple steps.
STEP 1: Upload the New WordPress Theme
Before you can activate your new theme, you need to upload it to your website.
But first, preview your theme to make sure it’s exactly what you want. Here’s how to do it:
Previewing a Theme Prior to Changing it
Previewing your new theme before uploading allows you to see how the theme will look and function without making any changes to your live site. There are two ways to preview themes, depending on whether they use blocks or the classic editor.
- Previewing Themes that use Blocks
If you’re considering a theme that uses the Gutenberg (block) editor, previewing it is easy. Click on the three dots icon and select the “Live Demo” option to see how the theme would look when applied to your site. If you’re satisfied with the appearance, click the “Activate” button at the top right. If not, simply click the “Close” button at the top left to exit the preview and explore other better themes that suit your needs.
- Previewing Themes that use the Classic Editor
For classic themes that use the Customizer, you’ll see a “Try & Customize” option in the Live demo panel. Click on it to see how the theme looks with your site’s content in the customizer without affecting the live site. Feel free to adjust settings and see how the new theme works with your content.
If you’re satisfied with the theme, click “Activate & Save.” If not, click the “X” to exit without making any changes. Remember that changes won’t affect your live site until you click “Activate & Save.”
Now that you’ve previewed the theme, it’s time to upload it. There are several ways to do this:
Upload Theme Using the Default WordPress Uploader.
WordPress has a built-in theme uploader that makes adding new themes to your website easy. Follow these steps to use it:
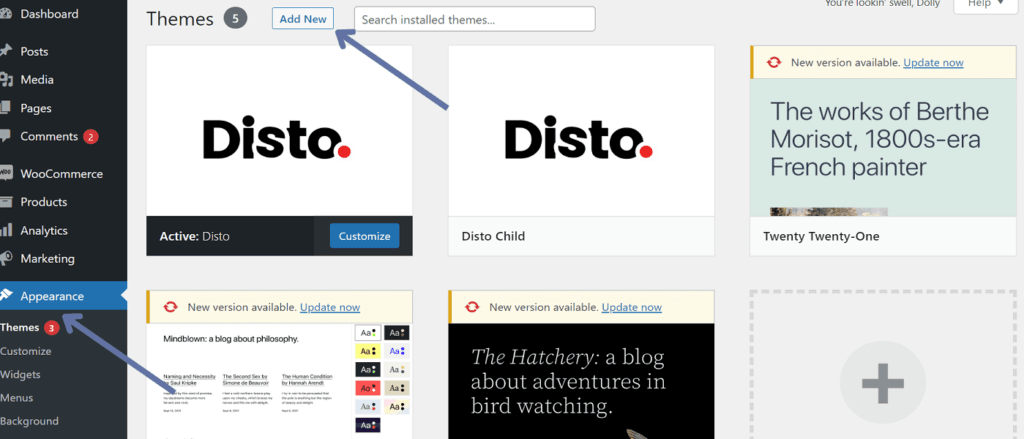
- Go to Appearance > Themes in your WordPress dashboard.
- Click “Add New” at the top of the page.
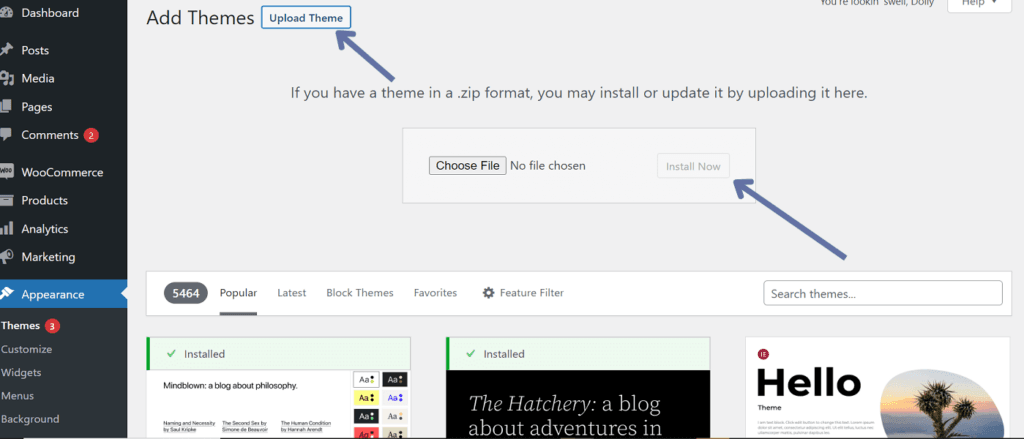
3. Click the “Upload Theme” button, and choose the theme’s .zip file from your computer.
4. Click “Install Now” and wait for the theme to upload.
Upload Theme Using a File Manager Plugin
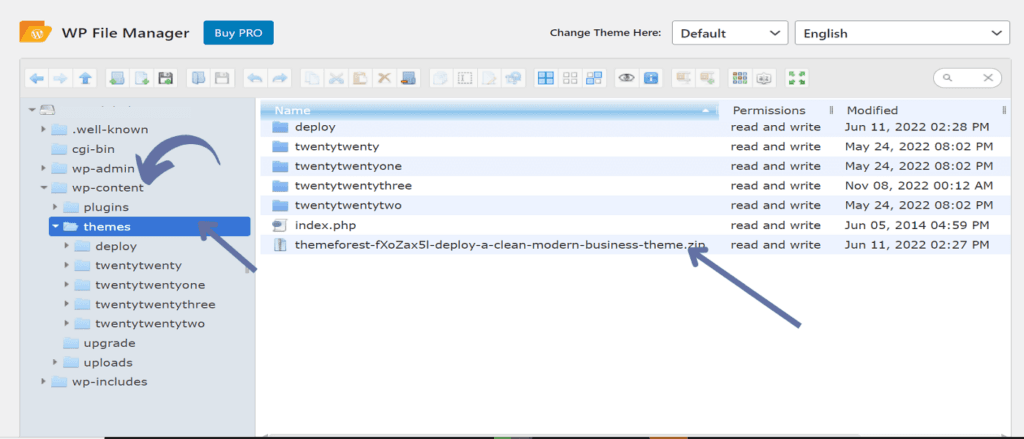
If you prefer using a plugin to manage your files, you can upload a new theme using a file manager plugin like “WP File Manager” from the WordPress plugin repository. To do this:
- Navigate to the plugin’s file manager interface in your dashboard.
- Upload the theme’s .zip file to the /wp-content/themes/ directory.
- Extract the .zip file in the same directory.
Upload Theme Using Cpanel File Manager:
If you can access your website’s cPanel, you can upload a new theme using the cPanel File Manager.
- First, log in to your website cPanel account and open the File Manager.
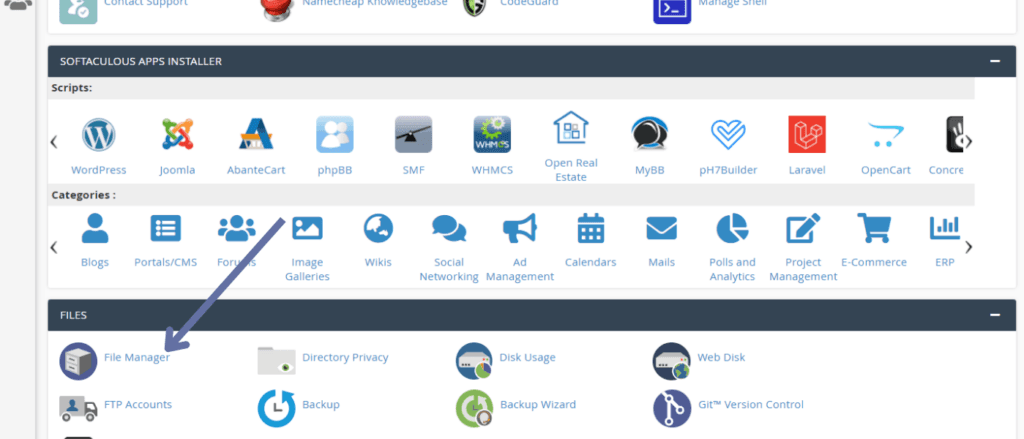
- Locate the “public_html/wp-content/themes” directory.
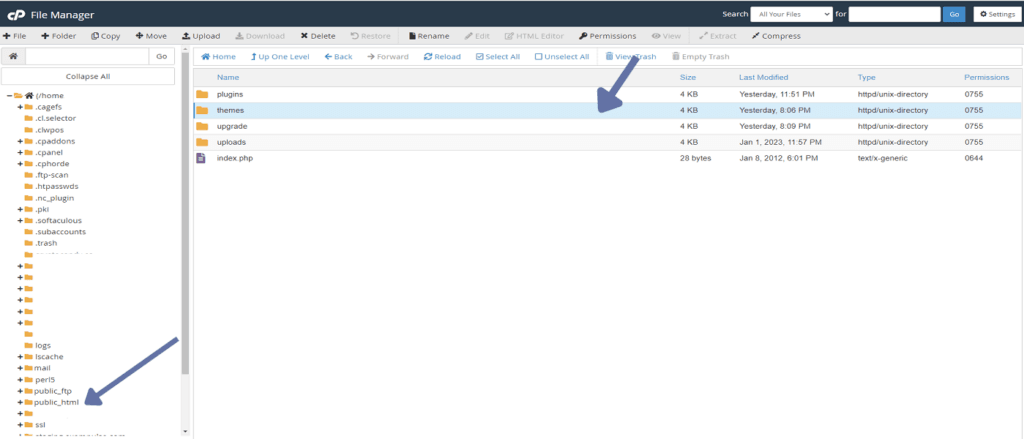
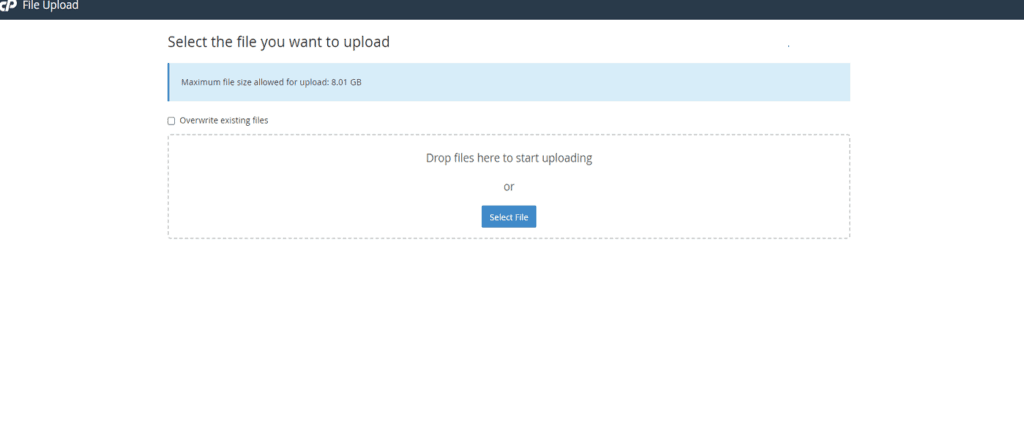
- Click “Upload” and select the theme’s .zip file from your computer.
- Once uploaded, right-click on the .zip file and select “Extract” to extract its contents into the “themes” folder.
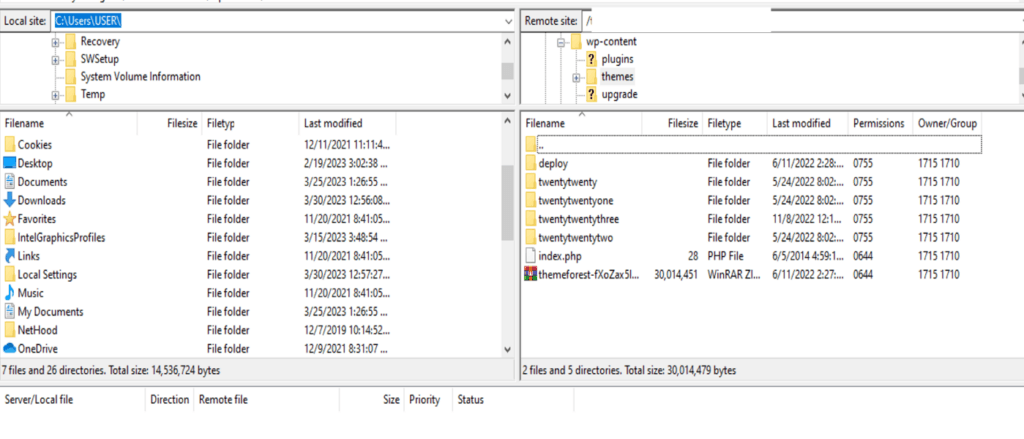
Upload Theme Using FTP
FTP (File Transfer Protocol) is a way to transfer files from your computer to your website’s server using an FTP client software such as FileZilla or Cyberduck. This method is beneficial if you have a large theme file or experience issues with the WordPress uploader. To use FTP to upload your theme:
- Connect to your server through an FTP client like FileZilla. Navigate to the /wp-content/themes/ directory on your server.
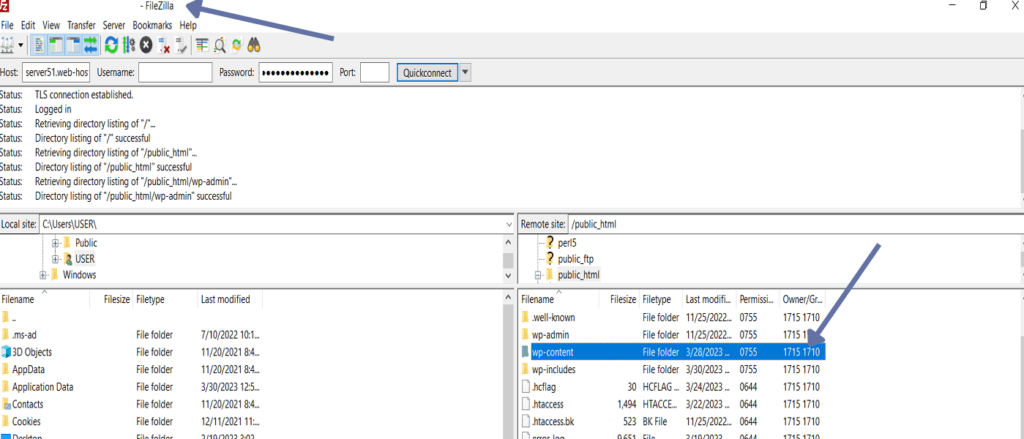
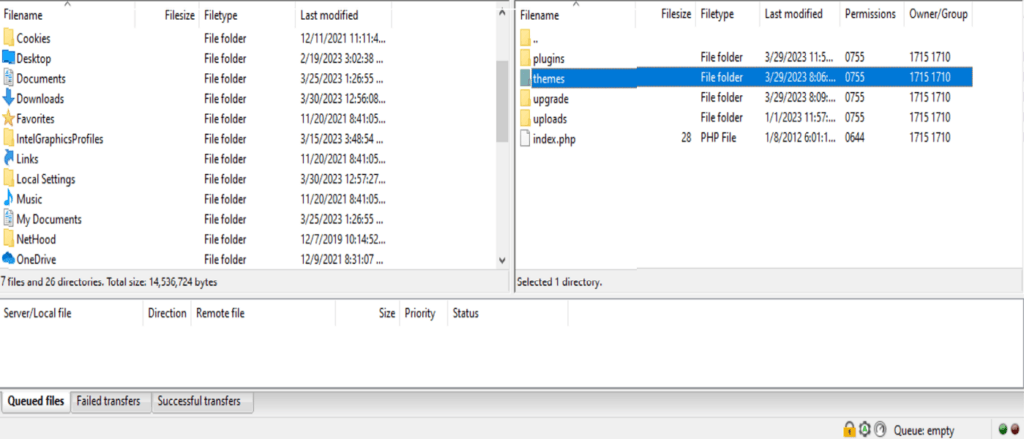
- Drag and drop the extracted theme folder (not the .zip file) from your computer to the /themes/ directory.
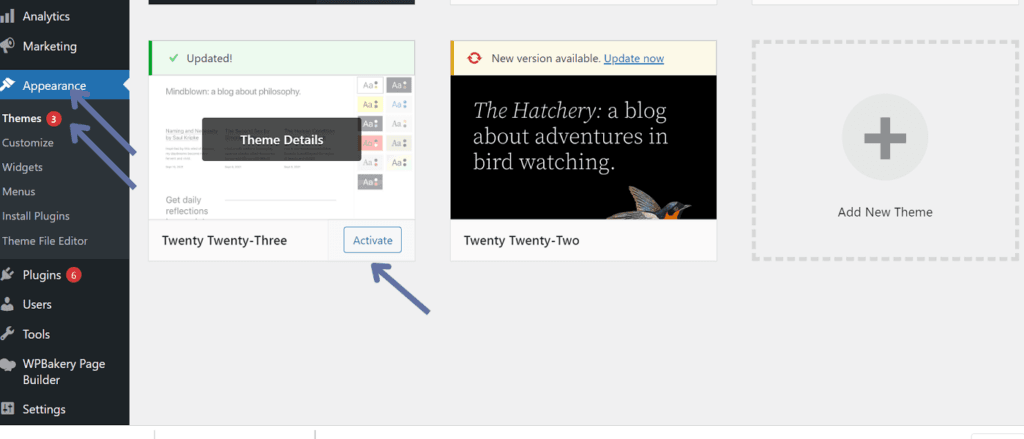
STEP 2: Activate and Setup the New WordPress Theme
Once you’ve uploaded your new theme, it’s time to activate it.
- Go to Appearance > Themes in your WordPress dashboard.
- Find the new theme and click the “Activate” button.
Decide if you would like to add demo content or not. Some themes come with demo content that you can import to help you get started. If you want to import demo content, follow the theme’s import instructions.
Set up your theme according to its instructions. This may involve customising colours, fonts, layout options, and other settings. Every theme is different, so follow the documentation provided by the theme developer to configure its settings and customise its appearance.
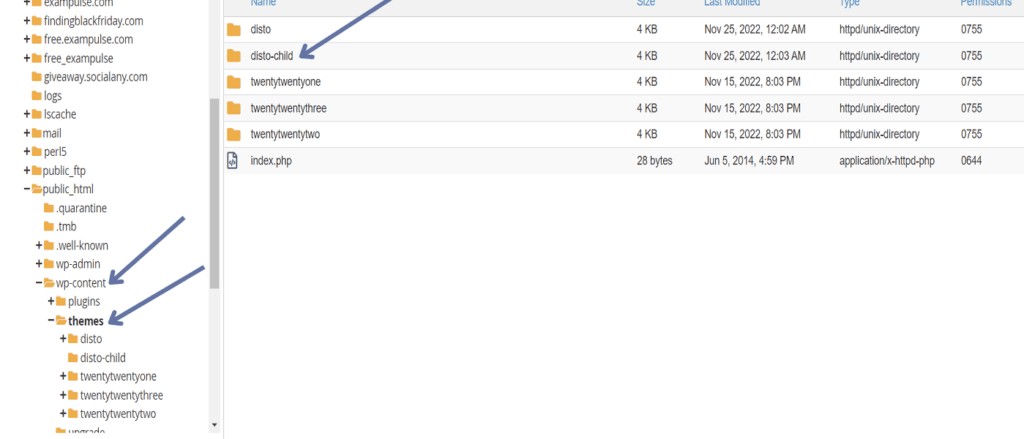
STEP 3: Create a Child Theme
To ensure your customisations are preserved when the parent theme is updated, you can create a child theme. Creating a child theme allows you to customise your theme without affecting the parent theme. Many themes come with a child theme, but you’ll have to create one manually if your theme doesn’t. To create a child theme:
- In your /wp-content/themes/ directory, create a new folder for your child theme (e.g., “mytheme-child”).
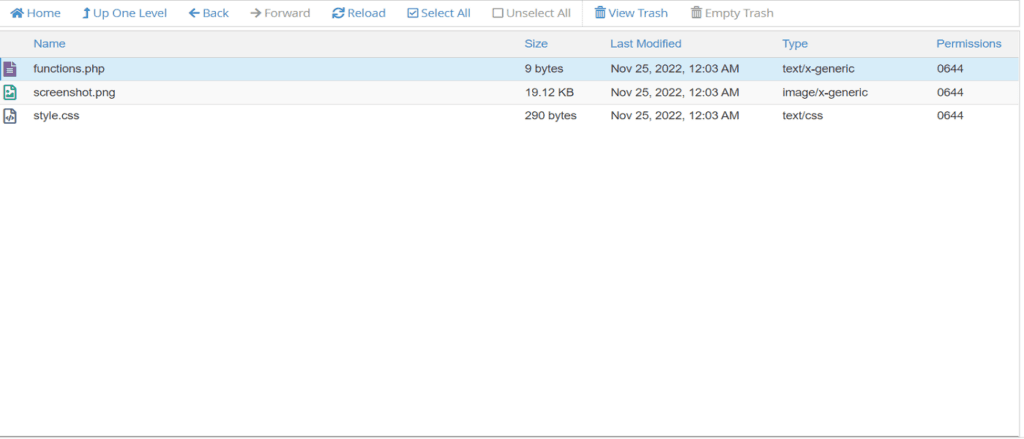
- In the child theme folder, create a style.css file and paste this code
| /* Theme Name: Mytheme Child Theme URI: http://example.com/theme/mytheme/demo/ Description: WordPress Blog Magazine Theme Author: Jellywp Author URI: http://themeforest.net/user/jellywp Template: mytheme Version: 1.5 */ @import url(“../mytheme/style.css”); |
Replace “mytheme” with the actual name of your child theme.
- Create a functions.php file in the child theme directory to add custom functions or to enqueue the parent theme’s styles.
- Activate the child theme in your WordPress dashboard by going to Appearance > Themes and clicking “Activate” on the child theme.
Now you’ve successfully changed your WordPress theme, but what if you want to change your theme without affecting your live website? This is where creating a staging site or using a theme-switching plugin comes in handy.
How to Change WordPress Theme Without Going Live
Getting a shiny new theme is great and all, but you don’t want to cause too much disruption to your live site. You especially don’t want visitors seeing your half-finished design.
There are two ways to change your WordPress theme without going live: either using a staging site or the ThemeSwitcha plugin. These methods allow you to keep up a professional appearance whilst you tinker behind the scenes.
Use a Staging Site
Earlier, we mentioned creating a staging site as one of the preparations you can take before changing your WordPress theme.
A staging site is a separate environment identical to your live site but not accessible to the public. It’s an ideal place to test new themes, plugins, and other changes before implementing them on your live site. So you can safely experiment with the new theme and make any necessary adjustments before it goes live.
Many hosting providers offer staging environments as part of their hosting plans. To set up a staging site, follow your hosting provider’s instructions (they’re usually very straightforward).
Once your staging site is ready, you can change the theme on the staging site without affecting your live site.
Here’s how to change the theme on your staging site:
- Log in to your staging site’s WordPress dashboard.
- Go to “Appearance” > “Themes.”
- Upload and activate the new theme(just like you would on your live site).
- Test the new theme and make any necessary adjustments.
When everything looks perfect on your staging site, you can push the changes to your live site. This process will vary depending on your hosting provider, so check their documentation or contact their support team for guidance.
Use Theme Switcha Plugin
If setting up a staging site feels like overkill, there’s another solution for you: the Theme Switcha plugin. Theme Switcha is a WordPress plugin that allows you to change your theme, preview it, and customise it in the backend while your visitors continue to see the current theme on the front end.
Here’s how to use Theme Switcha:
- Install and activate the Theme Switcha plugin.
- Go to Settings » Theme Switcha on your WPAdmin sidebar.
- On the Settings page, “Enable theme switching” option and scroll to the page’s bottom. When you are done, click on Save Changes.
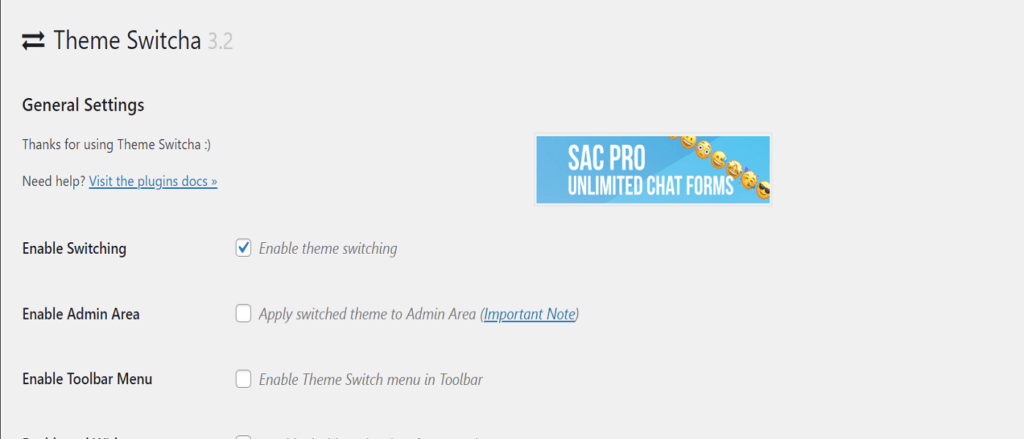
Now the plugin will display all your installed themes at the bottom of the page. You can now click on your new theme and preview it on a new tab.
How to Change WordPress Theme Manually (When Website Is Inaccessible)
We generally don’t recommend manually changing a WordPress theme, as using the wp-admin Themes dashboard is a more straightforward and secure approach.
However, if your website becomes inaccessible due to a theme-related issue, manually resetting the website to a default theme can be a viable solution if no backup is available.
To manually change a WordPress theme, you’ll need to modify WordPress files and the database through phpMyAdmin.
Here’s how to change a WordPress theme manually:
1. Activate maintenance mode on your website to reduce disruptions for visitors. You can use the WP Maintenance Mode plugin to notify your users that your site is undergoing updates.
2. Connect to your website using an FTP client and navigate to the /wp-content/themes/ folder, where all your installed themes are located. This folder is typically located in the /public_html directory.
3. If you have a zipped file for your theme, upload it to the /themes folder, and extract the contents.
4. Note down the exact folder name for the theme you want to activate. Ensure you record it exactly as it is, without any alterations to spacing or characters.
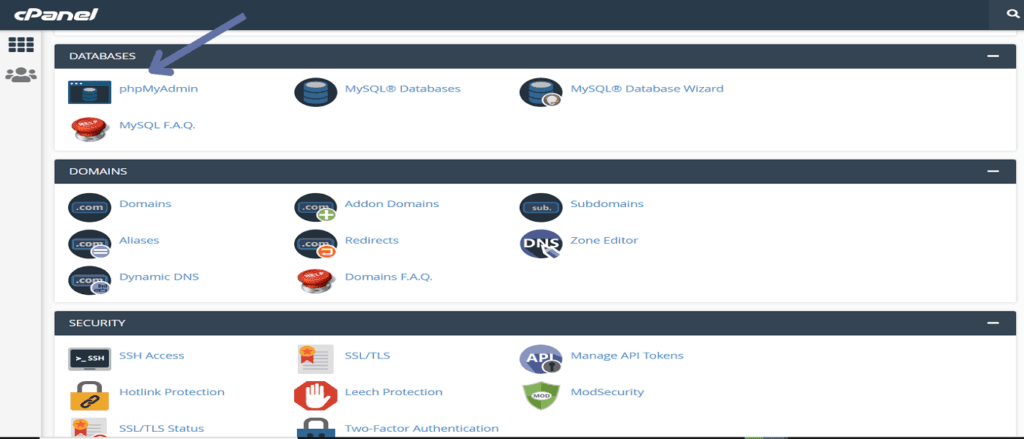
5. Go to your WordPress hosting account’s control panel (cPanel), scroll to the Databases section, and click phpMyAdmin.
6. Within phpMyAdmin, you’ll find a list of databases on the left-hand side of the screen. Click on the database associated with your WordPress site. If you have multiple databases and are uncertain which one is correct, you can locate the active database name in the wp-config.php file.
7. Next, find the wp_options table and scroll down the option_name column. You will come across two entries in this column: template and stylesheet.
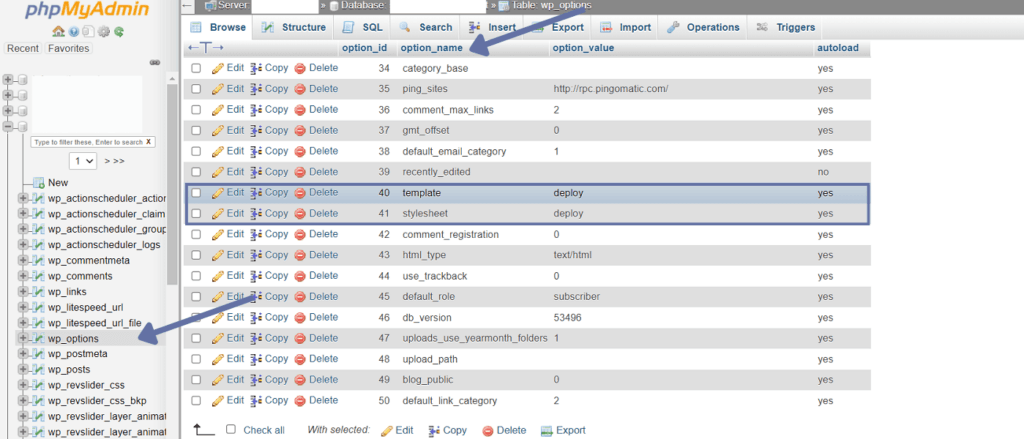
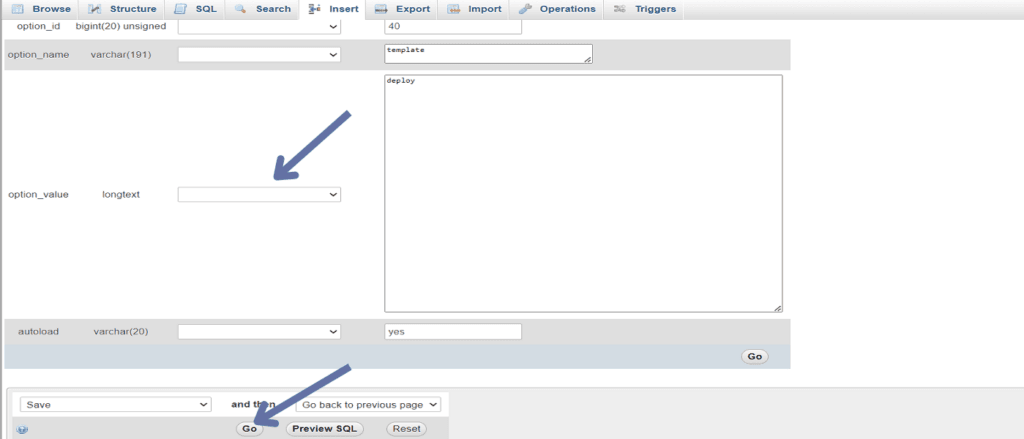
8. Click the Edit link within the “template” row to access the editor. Change the value in the option_value field to correspond with the name of the theme you want to implement. Ensure it matches the folder name in the /wp-content/themes/ directory you noted previously.
9. After completing these changes, click the Go button to save them. Repeat this process for the “stylesheet” row.
Now, go to your website and refresh the page. Your site should now display using the new theme you activated.
Be careful while doing this, as even a minor typo while updating the theme name in the database can cause your site to crash. WordPress relies on a theme to function properly, and the values in the database inform the core system about the active theme and the location of the required files.
The manual approach should be a last resort among the various methods available to change a WordPress theme. It’s time-consuming compared to more efficient alternatives and involves meddling with WordPress files and the database. This is generally only advised if you’re an expert or in a critical situation.
Steps to Take Following a WordPress Theme Change
So, you’ve successfully changed your WordPress theme, and it’s looking fantastic. Awesome! But don’t start popping champagne bottles just yet.
You still need to make sure that everything’s running smoothly post-theme-change. Let’s go through the essential steps you should follow after changing your WordPress theme:
Test Your Website
First up, thoroughly test your website to ensure everything is functioning as expected. Check for broken links, missing images, and formatting issues. Pay special attention to the navigation menu, contact forms, and other interactive elements. You don’t want your visitors to encounter any unpleasant surprises!
Measure and Compare Loading Time
After changing your WordPress theme, measuring and comparing your site’s loading time is essential. As discussed earlier, site speed is crucial for user experience and SEO.
Measure your loading time and compare it to your previous theme. If the new theme loads significantly slower, you may need to optimise it or reconsider your choice.
Cross Browser Compatibility
Your website may look great on your preferred browser, but what about others? Test your site on different browsers like Chrome, Safari, Firefox, and Edge to ensure it displays and works properly across the board. And remember to compare how it functions on desktop and mobile devices for a comprehensive review.
Add Tracking Codes
If you were using tracking codes with your previous theme (e.g., Google Analytics or Adsense), re-add them to your new theme. This will ensure that you continue to collect valuable data on your website’s performance and visitor behaviour.
Turn Off Maintenance Mode
Once you’re confident that your website is functioning correctly and looks great, you can turn off maintenance mode and unveil your new theme to your visitors. If you used the WP Maintenance Mode plugin or any other plugin to activate maintenance mode, you can turn it off from the plugin’s settings.
Monitor Bounce Rate
Track your website’s bounce rate after the theme change. If it increases significantly, your new theme might not be as user-friendly as you thought. If that’s the case, consider tweaking the design or switching to another theme that suits your audience’s preferences better.
Ask for Feedback
Finally, don’t be afraid to ask your visitors for feedback on your site’s design. You can reach out through social media, blog comments, or even email your subscribers. Their input can help you make necessary adjustments and ensure that your website meets their needs and expectations.
How To Return to a Previous WordPress Theme
There may be instances where you want to revert to a previous WordPress theme, either due to compatibility issues or personal preferences. The process of returning to an earlier theme can differ depending on whether you have imported demo content or not. Here are the steps for both scenarios:
If You’ve Imported Demo Content – Use Backup:
In cases where you have imported demo content, it is crucial to use the backup you created before switching to the new theme. Restoring a backup ensures that all your previous settings, content, and customisations are preserved.
- Locate your backup file: Locate the backup file you created before changing the theme. Store it in a secure location, like an external hard drive or a cloud storage service.
- Restore your backup: To restore your backup, access your WordPress admin dashboard and go to the backup plugin you used for creating the backup. Follow the plugin’s instructions for restoring your website to its previous state. Once the process is complete, your previous theme and its content and settings will be reinstated.
If You Haven’t Imported Demo Content – Repeat the Theme Switching Steps:
If you haven’t imported demo content, you can simply follow the same steps you used when switching to the new theme.
- Go to your WordPress dashboard: Navigate to your WordPress admin dashboard and head to the “Appearance” section. Click on “Themes” to view the available themes.
- Locate your previous theme: Scroll through the list of installed themes to which you wish to revert. If you have deleted the theme, you may need to reinstall it by downloading it from the WordPress theme repository or the theme developer’s website.
- Activate your previous theme: Hover over your desired theme and click the “Activate” button. Your website will now be displayed using the previous theme and its settings and customisations.
Remember to test your website and ensure everything functions correctly and looks as it should after reverting to the former theme.
Bottomline
Changing your WordPress theme can be straightforward if you follow the steps and precautions. Each step contributes to a successful and smooth transition from preparing your website for the change, to monitoring it after the switch.
More WordPress Guides:
Book a 30-min Introduction Call
Let's jump on a quick intro call We'll break down your project, and pinpoint exactly how we can help.


Our clients  Holaa! love working with us see their stories below!


